
INTRODUCTION
There’s something deeply satisfying about turning firm, unripe green tomatoes into shelf-stable jars you can enjoy all year long. Whether you harvested them before frost or ended up with a garden full of unripe fruit, canning green tomatoes is one of the smartest ways to prevent waste and preserve flavor.
I still remember my first batch—honestly, I rushed it and almost skipped the acid adjustment step. That one small mistake could have ruined everything. That’s why this guide is different.
👉 This isn’t just a recipe—it’s a USDA-compliant, safety-first method designed to protect your food, your health, and your pantry investment.
According to USDA and food safety experts, green tomatoes must be acidified properly before canning, because they are borderline low-acid foods. That means no guessing, no shortcuts.
In this complete guide, you’ll learn:
Table of Contents
Let’s do this the right way—safe, profitable, and delicious.
Quick Answer
Yes, you can safely can green tomatoes—but only if you follow USDA-approved methods.
✔ Use 5% acidity vinegar or bottled lemon juice
✔ Process using a boiling water bath (not optional)
✔ Follow tested recipes only (no improvising acidity levels)
Green tomatoes are slightly acidic but not acidic enough on their own, so proper acidification is required to prevent harmful bacteria like botulism.
Why Safety Matters
When it comes to canning, safety isn’t optional—it’s everything.
According to USDA guidelines and the National Center for Home Food Preservation:
“Foods that are not properly acidified can support the growth of Clostridium botulinum, which produces a deadly toxin.”
Green tomatoes fall into a tricky category. Unlike fully ripe tomatoes, their acidity can vary widely. That’s why:
👉 You must always add acid (vinegar or bottled lemon juice)
👉 You must follow tested processing times
From my own experience, skipping even a small detail—like using fresh lemon juice instead of bottled—can completely change the pH level. That’s not a risk worth taking.
What Makes Green Tomatoes Perfect for Canning?
Green tomatoes aren’t just a backup plan—they’re actually one of the most versatile canning ingredients.
Firm Texture
Unlike ripe tomatoes, green ones hold their shape during processing. That means no mushy jars.
Unique Flavor
They offer a slightly tart, fresh taste that works perfectly for:
- Pickling
- Relishes
- Fried dishes later
Waste Reduction
If frost is coming and your tomatoes aren’t ripening, this is your best solution.
Long Shelf Life
Properly canned green tomatoes can last 12–18 months when stored correctly.
Essential Tools & Equipment For Canned Green Tomatoes
Before you start, having the right tools makes the process safer, easier, and more efficient.
Must-Have Equipment
- Water bath canner (or deep pot with rack)
- Mason jars (pint or quart)
- New lids and bands
- Jar lifter (for safety)
- Funnel (prevents spills)
- Bubble remover tool or spatula
💡 Personal tip: I tried skipping the jar lifter once—never again. Handling hot jars without it is risky and unnecessary.
Best Choice vs Alternatives
| Tool | Best Choice | Alternative | Verdict |
|---|---|---|---|
| Canner | Water Bath Canner | Large Pot + Rack | Best for consistency |
| Jars | Mason (Ball/Kerr) | Generic jars | Stick to trusted brands |
| Lids | New lids | Reused lids | NEVER reuse lids |
| Acid | Bottled lemon juice | Fresh lemon | Bottled only (consistent pH) |
👉 Best Investment: A proper water bath canner saves time and ensures even heat distribution.
👉 Avoid: Cheap jars and reused lids—they can fail sealing and ruin your batch.
Ingredients For Canned Green Tomatoes
To safely can green tomatoes, you must follow tested ingredient ratios. According to USDA and the National Center for Home Food Preservation, altering acid levels can make your food unsafe.
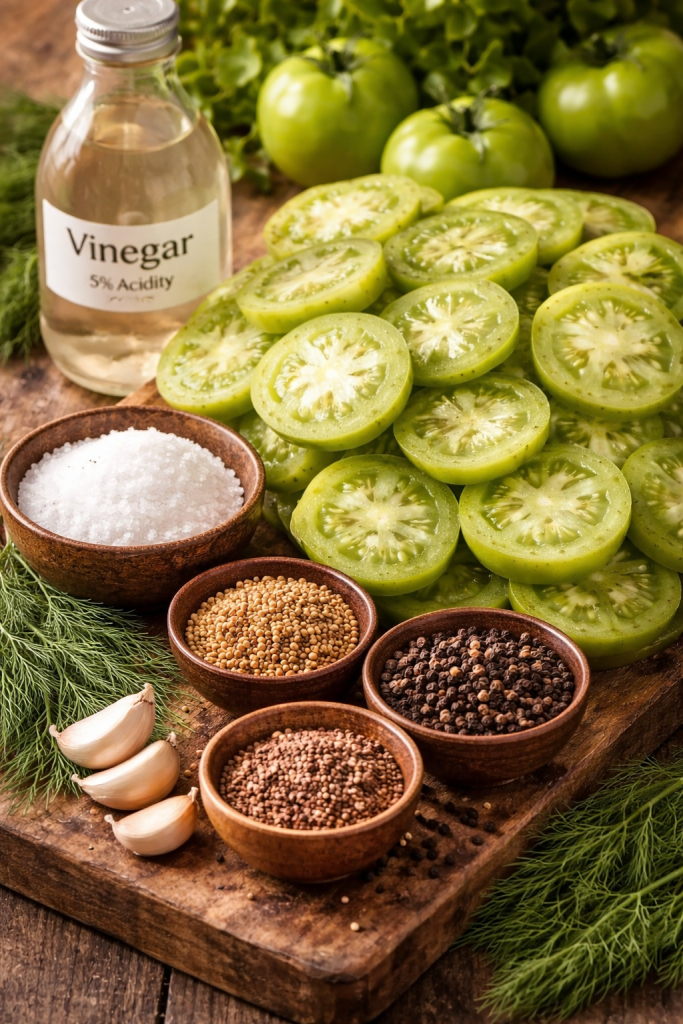
Base Ingredients
- 5 pounds firm green tomatoes (unripe)
- 1 quart 5% acidity vinegar
- 1 quart clean water
- 2 tablespoons canning/pickling salt
Optional Flavor Additions
- Garlic cloves
- Dill seeds or fresh dill
- Mustard seeds
- Black peppercorns
- Red pepper flakes (for heat)
⚠️ CRITICAL SAFETY NOTE:
These optional ingredients do not affect acidity, so they are safe—but you must NEVER reduce vinegar or increase water.
💡 Quick tip from experience: I once added extra water to “soften the taste”—bad idea. The jars sealed, but the batch wasn’t safe. Stick to the ratio.
Preparation Before Canning
Before you even turn on the stove, proper prep ensures both food safety and final quality.
Step 1: Wash Tomatoes Properly
- Rinse under running water (no soap)
- Remove dirt, stems, and damaged spots
Step 2: Cut Evenly
- Slice into ¼-inch rounds or wedges
- Uniform size = even heat penetration
Step 3: Sterilize Jars
- Boil jars for 10 minutes (if processing under 10 min)
- Keep jars hot until use
Step 4: Prepare Your Workspace
- Clean surfaces thoroughly
- Keep tools within reach
💡 Personal tip: Preparing everything before starting reduces stress and mistakes. Canning is not the time to multitask.
Step-by-Step USDA-Safe Canning Process
This is the core of the process. Follow every step exactly—no shortcuts.

Step 1: Make the Brine
In a large pot:
- Combine vinegar, water, and salt
- Bring to a rolling boil
👉 This creates the acidic environment needed for safe preservation.
Step 2: Pack the Jars
- Add optional spices to each jar
- Pack tomato slices tightly (but not crushed)
- Leave ½ inch headspace
💡 From experience: Too loose = floating tomatoes. Too tight = poor brine flow. Aim for snug, not packed.
Step 3: Add Hot Brine
- Pour boiling brine over tomatoes
- Maintain ½ inch headspace
Step 4: Remove Air Bubbles
- Use a spatula or bubble remover
- Slide along jar edges
👉 This prevents spoilage and ensures proper sealing.
Step 5: Clean Rims & Seal
- Wipe rims with clean cloth
- Place lids and screw bands (finger-tight only)
Step 6: Water Bath Processing
- Place jars in boiling water canner
- Ensure water covers jars by at least 1–2 inches
⏱ Processing Time:
- Pint jars: 15 minutes
- Quart jars: 20 minutes
(Start timing after water returns to full boil)
If You are completely new in canning you can learn our full article about Beginner’s Guide to Pressure Canning Here.
❄️ Step 7: Cool & Check Seals
- Remove jars carefully
- Let sit undisturbed for 12–24 hours
✔ Lid should not flex when pressed
Altitude Adjustments
If you’re above 1,000 feet elevation, you MUST increase processing time.
| Altitude | Processing Time Adjustment |
|---|---|
| 0–1,000 ft | Standard time |
| 1,001–3,000 ft | +5 minutes |
| 3,001–6,000 ft | +10 minutes |
| 6,001+ ft | +15 minutes |
⚠️ Ignoring altitude = unsafe food, even if everything else is correct.
You learn our full article about 15 Best Foods to Can for Long-Term Storage
Safety Checklist
Food safety experts recommend checking every jar before storage:
✔ Lid is sealed
✔ No leaks or residue
✔ Brine is clear
✔ Proper headspace maintained
🚫 Discard immediately if:
- Lid didn’t seal
- Smell is off
- Liquid is bubbling (after storage)
Flavor Variations
Once you master the base recipe, you can safely customize flavors.
Spicy Version
- Add red pepper flakes or sliced chili
Garlic Dill Classic
- Garlic + fresh dill = traditional flavor
Mustard Pickle Style
- Mustard seeds + turmeric (optional)
Sweet-Tangy Twist
- Add a small amount of sugar
💡 My favorite: Garlic + dill + peppercorns—simple but incredibly flavorful after 2 weeks.
When Are They Ready to Eat?
One of the most common questions I get is: “How long should I wait before opening the jars?”
Technically, your canned green tomatoes are safe to eat once they’ve cooled and sealed properly. But flavor-wise? That’s a different story.
Recommended Waiting Time
- Minimum: 2 weeks
- Best Flavor: 4–6 weeks
- Peak Taste: Around 2–3 months
During this time, the vinegar, salt, and spices fully penetrate the tomatoes, creating that classic tangy, slightly crisp bite.
💡 Personal tip: I once opened a jar after just 5 days—safe, but honestly bland. Waiting those extra weeks makes a huge difference.
Common Mistakes That Can Ruin Your Batch
Even experienced home canners make mistakes. The difference is—they learn and fix them. Let’s make sure you don’t waste time, money, or food.
1. Reducing Vinegar (MOST DANGEROUS)
Some people try to “tone down” the sourness by adding more water.
👉 This is unsafe.
According to USDA guidelines, proper acidity is what prevents dangerous bacteria growth.
2. Using Fresh Lemon Juice Instead of Bottled
Fresh lemons vary in acidity.
✔ Always use bottled lemon juice for consistent pH.
3. Skipping Water Bath Processing
Just sealing jars is NOT enough.
👉 Without proper processing, harmful bacteria can survive.
4. Reusing Old Lids
Used lids may not seal correctly.
✔ Always use new lids—this is a small cost that prevents big losses.
5. Overpacking or Underpacking
- Too tight → poor brine circulation
- Too loose → floating tomatoes
👉 Aim for firm but not crushed packing
6. Ignoring Headspace
Too much or too little space affects sealing.
✔ Stick to ½ inch headspace
💡 Real lesson: My second batch failed because I reused lids. Every jar looked fine—until two days later when seals popped. Never again.
Read here our full guide about 10 Common Canning Mistakes For Beginner to avoid your mistakes
Money-Saving Tips
Canning isn’t just about preservation—it’s also a smart way to save money if done right.
Buy Tomatoes in Bulk
- End-of-season tomatoes are often cheap or free
- Ask local farmers for “seconds” (slightly imperfect produce)
💡 I’ve personally gotten 10+ pounds for almost nothing this way.
Reuse What You Safely Can
- ✔ Glass jars (if undamaged)
- ✔ Metal bands
🚫 But NEVER reuse lids
Buy Supplies in Off-Season
- Canning tools are cheaper in winter
- Stock up early for next season
Batch Processing Saves Energy
- Run full canner loads instead of small batches
- Saves time, gas, and effort
Grow High-Yield Tomato Varieties
If you’re serious about canning:
- Choose varieties that produce heavily
- Harvest before frost for green tomato batches
Top Recommended Canning Tools (Beginner → Pro Picks 2026)
If you want consistent results and zero sealing failures, using the right tools matters more than most beginners realize.
💡 From experience: switching to better lids + a proper canner instantly fixed my failed batches.
🥇 Best Overall: Reliable Starter Kit
- Water bath canner
- Jar rack + lid lifter
- Funnel + bubble remover
👉 Perfect for beginners who want everything in one purchase
👉 Saves money vs buying tools separately
✔ Why it’s worth it:
You avoid compatibility issues and get consistent results from day one.
One popular option many beginners choose is the Supa Ant Water Bath Canning Starter Kit, which includes essential tools like a canner pot, rack, jar lifter, and funnel.
👉 View current price and details on Amazon: View on Amazon
It’s a practical choice if you want a complete setup without the hassle of buying tools separately.
💰 Budget Option: Basic Pot + Rack Setup
- Large deep pot
- Simple rack insert
👉 Good if you’re just testing canning
⚠️ Limitation: Less consistent heat distribution
👉 My tip: Upgrade once you start doing multiple batches
🏆 Premium Choice: Heavy-Duty Stainless Steel Canner
- Even heat distribution
- Long lifespan
- Handles large batches
👉 Best for:
- Bulk canning
- Serious home preservers
✔ If you plan yearly canning, this pays off quickly.
Storage & Shelf Life
Proper storage is just as important as proper canning.
Ideal Storage Conditions
- Cool (50–70°F / 10–21°C)
- Dark place (no direct sunlight)
- Dry environment
Label Everything
Always include:
- Date of canning
- Batch or flavor type
💡Trust me—after 6 months, every jar looks the same.
Shelf Life
- Best quality: 12 months
- Still safe (if sealed): up to 18 months
Before Eating
✔ Lid is still sealed
✔ No off smell
✔ No mold or cloudiness
🚫 If anything looks suspicious—Throw it away immediately
Personal Experience
I’ve been canning for years now, and green tomatoes are one of those things I underestimated at first.
My first successful batch? Honestly, it felt like unlocking a new level of self-sufficiency. Instead of watching unripe tomatoes go to waste, I turned them into something I could enjoy months later.
But I also made mistakes—cut corners, skipped small steps, trusted guesswork.
That’s exactly why I emphasize USDA guidelines so strongly in this guide.
👉 Because canning is one of those things where:
- Doing it right = long-term reward
- Doing it wrong = wasted food (or worse)
Now, every time I open a jar in the middle of winter, it’s worth every careful step.
Best Tools & Products for Canning Green Tomatoes
If you want consistent, safe, and stress-free results, the right tools make a huge difference. You don’t need everything—but a few smart investments will save you time and prevent costly mistakes.
Must-Have Tools (High Priority)
Water Bath Canner
- Ensures even heat distribution
- Designed specifically for safe processing
- Ideal for beginners and pros
👉 Best choice if you plan to can regularly
Mason Jars (Ball or Kerr)
- Reliable sealing performance
- Available in multiple sizes
- Durable and reusable
👉 Avoid cheap jars—they can crack or fail to seal
Jar Lifter
- Prevents burns
- Improves safety and control
💡 One of those tools you don’t realize you need—until you try without it.
Helpful Add-Ons
- Wide-mouth funnel (less mess)
- Bubble remover tool
- Magnetic lid lifter
- Digital kitchen scale (accuracy)
Smart Buying Strategy
- Buy kits (cheaper than individual items)
- Invest once, use for years
- Avoid unnecessary gadgets
Comparison Table
| Category | Best Option | Alternative | Verdict |
|---|---|---|---|
| Canner | Water bath canner | Large pot + rack | Best for safety |
| Jars | Ball/Kerr jars | Generic jars | Trusted brands win |
| Lids | New lids | Reused lids | Never reuse |
| Acid | Bottled lemon juice | Fresh lemon | Bottled only |
| Tools | Full starter kit | Individual tools | Kit saves money |
Beginner-Friendly Guides You Should Read Next:
- Beginner’s Guide to Pressure Canning
- Water Bath VS Pressure Canning
- How to Sterilize Jars Properly
- 10 Common Canning Mistakes
- 12 Best Vegetables to Can for Long-Term Storage
FAQ
Can you can green tomatoes without vinegar?
No. According to USDA guidelines, green tomatoes must be acidified. Without vinegar or bottled lemon juice, the product is unsafe.
Do green tomatoes need pressure canning?
No. If properly acidified, they can be safely processed using a water bath canner.
Why are my canned tomatoes floating?
This usually happens due to:
- Loose packing
- Air trapped in jars
It’s not unsafe, but affects appearance.
How long do canned green tomatoes last?
- Best quality: 12 months
- Safe if sealed: up to 18 months
Can I reduce salt in the recipe?
Yes, salt is for flavor—not safety. But do NOT change vinegar levels.
Why is my brine cloudy?
Possible reasons:
- Using iodized salt
- Spoilage (if smell is off)
👉 Always check before consuming.
Final Expert Tips
- Always follow tested recipes only
- Never guess acidity levels
- Label everything clearly
- Store in cool, dark places
According to USDA recommendations, consistency and accuracy are the keys to safe home canning.
💡 One small shortcut can undo hours of work—don’t risk it.
Conclusion
Canning green tomatoes isn’t just about preserving food—it’s about making smarter use of what you already have.
Instead of wasting unripe tomatoes at the end of the season, you’re turning them into something:
✔ Shelf-stable
✔ Flavorful
✔ Cost-effective
But more importantly—you’re doing it safely.
By following USDA-approved methods, using the right tools, and avoiding common mistakes, you’re not just making food—you’re building confidence in your kitchen.
💬 From my experience, the first successful batch always feels like a small win—but it quickly becomes a habit you rely on every year.