
INTRODUCTION
Imagine spending a grueling weekend in a humid kitchen, peeling bushels of peaches or snapping pounds of green beans. You’ve followed your grandmother’s recipe to a T, the jars “pinged” beautifully on the counter, and you’ve stacked them neatly in your pantry. But six months later, you notice a slight discoloration in the liquid of your carrots, or a lid that doesn’t seem as concave as it once was. A cold shiver runs down your spine: Is this food safe to eat?
In the world of home food preservation, the stakes are incredibly high. We aren’t just talking about a sour taste or a ruined dinner; we are talking about the potential for life-threatening neurotoxins. Spoilage in home-canned goods can be subtle, silent, and invisible. According to the USDA and the National Center for Home Food Preservation (NCHFP), relying on your nose or a quick “taste test” is one of the most dangerous mistakes a home cook can make.
This guide is designed to be your professional-grade safety manual. We are going to bridge the gap between “homesteading intuition” and rigorous scientific safety. By the end of this deep dive, you will not only know how to spot a “ticking time bomb” jar in your pantry, but you will also understand the high-performance equipment and techniques required to prevent spoilage before it ever begins. Whether you are aiming for total self-sufficiency or just want to save money on your grocery bill, safety is the foundation of your success.
Table of Contents
Quick Answer: The 5-Point Spoiled Canned Food Checklist
To ensure your home-canned food is safe, perform these five checks:
- Lid Integrity: The lid must be concave and immovable. If it clicks or bulges, discard it.
- The Vacuum Sound: A loud “woosh” or “pop” of air entering the jar is mandatory. If liquid spurts out, the food is contaminated.
- Visual Indicators: Look for “ropiness” in liquid, rising bubbles, or any sign of mold (even microscopic white specks).
- Odor Check: Any sharp, sour, or putrid smell is a sign of bacterial activity.
- The Golden Rule: When in doubt, throw it out. Never taste food you suspect is spoiled.
What is Spoiled Canned Food?
To truly master food preservation, you must think like a microbiologist. Spoiled canned food is the result of a failure to create or maintain a sterile, anaerobic environment. In nature, bacteria, yeasts, and molds are designed to break down organic matter. When we “can” food, we are essentially trying to hit the “pause” button on biology.
There are three primary culprits behind spoilage in home-canned goods:
- Bacteria: Specifically Clostridium botulinum, which produces the botulism toxin, and thermophilic bacteria that thrive if jars are stored in hot environments.
- Yeasts: These are common in high-acid foods like fruits and jams. They cause fermentation, which leads to gas production and “bouncing” lids.
- Molds: Molds require oxygen. If you see mold, it means your seal failed, allowing air to seep back into the jar.
Spoilage isn’t always “rotten.” Sometimes it manifests as Flat-Sour Spoilage. This happens when certain bacteria survive the canning process and produce acid without producing gas. The lid stays sealed, the jar looks fine, but the food inside has a sharp, unpleasant, acidic taste and smell. Understanding these distinctions is why food safety experts recommend a multi-sensory inspection of every single jar you open.
The Science of Spoilage: Bacteria, Yeasts, and Molds
To truly master food preservation, you must think like a microbiologist. Spoilage isn’t a singular event; it is a spectrum of microbial activity. According to food safety experts, the most common form of spoilage in high-acid foods (like jams and pickles) is caused by yeasts and molds. These organisms are fungal in nature and can survive in acidic environments where most bacteria cannot. If you see a “furry” growth or active bubbles in your peach preserves, you are witnessing a yeast colony fermenting the natural sugars into alcohol and carbon dioxide.
However, the real danger in home canning lies with anaerobic bacteria, specifically Clostridium botulinum. This bacterium is unique because it produces “spores” that act like armored seeds. These spores can survive boiling water ($212°F$) for hours. Only the intense heat of a pressure canner ($240°F$ or higher) can crack that armor and kill the spore. If the spore survives, it “germinates” in the vacuum of your jar and releases a neurotoxin. This is why low-acid vegetables must be pressure canned—there is no middle ground when it comes to bacterial spores.
Another common but less dangerous form of spoilage is Flat-Sour. This is caused by Bacillus coagulans. Unlike botulism, these bacteria do not produce gas, so the lid stays sealed and looks perfect. However, they produce a high amount of acid that makes the food taste incredibly sour and “off.” This usually happens when jars are not cooled quickly enough after processing or are stored in a room that is too warm (above $95°F$). Understanding these biological nuances allows you to move from “following a recipe” to “managing a controlled environment.” When you understand the why behind the science, you become a much more confident and safe home canned food expert.
Why Safety Matters:
When discussing signs of spoiled canned food, we must address the “elephant in the pantry”: Botulism. Unlike common food poisoning that causes a few days of stomach upset, botulism is a severe form of paralytic illness. The spores of C. botulinum are everywhere—in soil and on the surface of produce. They are harmless when exposed to oxygen, but inside a vacuum-sealed, low-acid canning jar, they “wake up” and produce a toxin.
The USDA categorizes foods into two groups: High-Acid ($pH \le 4.6$) and Low-Acid ($pH > 4.6$).
- High-Acid Foods: Fruits, pickles, and jams. The acidity naturally prevents botulism spores from growing. These can be safely processed in a Boiling Water Bath Canner.
- Low-Acid Foods: Meats, poultry, seafood, and all vegetables (except acidified tomatoes). These require a Pressure Canner to reach $240°F$ ($116°C$).
If you process a low-acid food in a water bath, you have created a perfect incubator for botulism. The most terrifying aspect? The toxin is odorless and tasteless. This is why following tested recipes from the NCHFP or the Ball Blue Book is not just a suggestion—it is a life-saving requirement.
USDA-Approved Guidelines for Safe Home Canning
According to USDA guidelines, food safety starts the moment you pick the produce and doesn’t end until the food is consumed. To minimize the risk of spoilage, you must adhere to these verified protocols:
- Use Validated Recipes: Never “wing it” or use “rebel canning” methods found on unverified social media. Recipes must have a specific processing time based on jar size and altitude.
- Altitude Adjustments: Water boils at lower temperatures at higher altitudes. If you live above 1,000 feet, you must increase your pressure (for pressure canning) or time (for water bath canning). Failure to do this results in under-processed, spoiled food.
- Sterilization: While jars for foods processed for 10 minutes or longer don’t strictly require pre-sterilization, they must be “squeaky clean.” Lids should be used according to the manufacturer’s current instructions (most modern lids do not require boiling).
- Cooling and Storage: Jars must sit undisturbed for 12 to 24 hours. Removing the rings (screw bands) after this period is a critical safety step to prevent “false seals.”
If you are new in canning you can learn our complete article about USDA Canning Safety Guidelines Explained Here.
Step-by-Step Safe Method: Spoiled Canned Food
Before you serve that home-canned beef stew or green bean casserole, put the jar through this rigorous 4-stage inspection.
Stage 1: The Visual Shelf Check
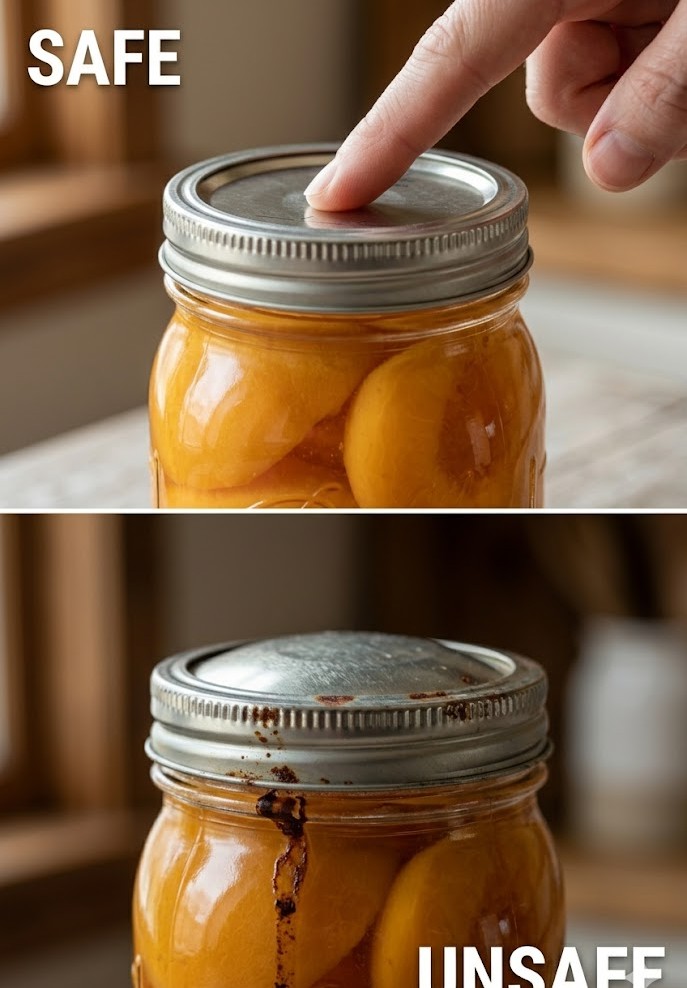
Before you even touch the jar, look at it. Is the liquid clear? Is there any sediment at the bottom? (Note: Starch from potatoes or peas can create safe white sediment, but it should not be “fuzzy”). Look for streaks of dried food on the outside of the glass, which indicates that food “siphoned” out during processing, potentially ruining the seal.
Stage 2: The Lid Stress Test
Remove the metal ring. Gently try to lift the flat lid with your fingernails. A true vacuum seal is incredibly strong; the lid should not budge. Press the center of the lid. If it makes a “click-clack” sound, the vacuum is gone. Discard immediately.
Stage 3: The “Woosh” Test
When you use a jar opener to pry the lid, listen for a sharp, clear popping sound. This is the sound of air rushing into the vacuum. If you hear a hissing sound of air rushing out, or if liquid sprays out like a shaken soda, the jar is under internal gas pressure from bacterial growth.
Stage 4: The Scent and Texture Check
Once open, do not put your face directly over the jar. Waft the scent toward you. Any “off” smell—yeasty, sour, or putrid—is a dealbreaker. Check the texture; if the food is slimy or has disintegrated into mush (and wasn’t supposed to be), enzymes or bacteria have won the battle.
When you are ready for you’re next recipe you should try our Safe Canned Beef Recipe.
Best Equipment & Tools: Investing in Safety and Longevity
If you want to avoid the heartbreak of spoiled canned food, you need the right gear. Using a “multi-cooker” or a thin stockpot for canning is a recipe for disaster.
1. The Pressure Canner (The Gold Standard)
For low-acid foods, you need a heavy-duty pressure canner. The All-American 1930 Canner is the “buy it for life” choice of experts. It features a metal-to-metal seal (no gaskets to perish) and a precision dial gauge.
- Why it matters: Consistent pressure is the only way to guarantee the $240°F$ ($116°C$) needed to kill botulism.
2. The Boiling Water Bath Canner
For fruits and pickles, a stainless steel water bath canner with a rack is essential. Avoid cheap enamel pots that chip and rust over time. A high-quality stainless steel pot can double as a stockpot, making it a better financial investment.
3. Glass Jars and Lids
Stick to Ball or Kerr jars. Generic “craft” jars often have thinner glass that can shatter under pressure. Always use new lids for every batch. The For Jars or Superb brands have gained a massive following for their thicker gaskets and higher success rates.
Safe vs. Unsafe Practices: The Comparison Table
| Feature | Safe Practice (USDA Aligned) | Unsafe Practice (“Rebel” Style) |
| Lids | Use new lids every time. | Reusing old lids to save money. |
| Canner Type | Pressure canner for all veggies/meats. | Water-bathing green beans or meat. |
| Storage | Store with rings removed. | Storing with rings on (hides seal failure). |
| Oven Canning | NEVER. Glass can explode; heat is uneven. | Using the oven to “seal” dry goods. |
| Recipes | NCHFP or Ball Blue Book only. | Using “Old Family Recipes” from 1920. |
7 Common Spoilage Mistakes
- Improper Headspace: If you leave too much air (headspace), the vacuum will be weak. If you leave too little, the food will expand and leak, preventing a seal.
- Not Removing Air Bubbles: Trapped air bubbles can expand during processing, causing “siphoning” and seal failure. Use a plastic bubble remover tool.
- Canning at the Wrong Altitude: This is the #1 silent killer. 10 lbs of pressure in Denver is NOT the same as 10 lbs in Miami.
- Using Chipped Jars: Even a microscopic nick in the rim of a jar will prevent a permanent seal.
- Cooling Jars with a Fan: Rapid cooling can cause “thermal shock,” breaking the jars or causing the sealing compound to fail before it sets.
- Storing in Direct Sunlight: Light causes chemical spoilage (oxidation), which destroys vitamins and turns food an unappetizing brown.
- Ignoring the Dial Gauge: Dial gauges must be tested annually for accuracy. If your gauge is off by 2 psi, your food is unsafe.
Advanced Equipment: Dial Gauge vs. Weighted Gauge Canners
For the serious home canner looking to maximize safety and efficiency, the choice of equipment is the most significant investment you will make. While the All-American 1930 is the industry leader for durability, you must choose between a Dial Gauge and a Weighted Gauge system for your pressure canning needs.
- The Dial Gauge: This allows for precise monitoring of pressure. If your recipe calls for 11 lbs of pressure, you can see exactly when you hit it. This is particularly helpful for those living at high altitudes where precise adjustments are necessary. Safety Note: The USDA and NCHFP mandate that dial gauges must be tested for accuracy every single year at your local county extension office. A gauge that is off by just 2 lbs can result in under-processed, dangerous food that leads to spoilage.
- The Weighted Gauge: These are often preferred by “set it and forget it” experts. The weights (usually 5, 10, and 15 lbs) will “jiggle” or rock when the correct pressure is reached. You don’t need to calibrate them, as the weight of the metal never changes. It provides an audible cue that your canner is operating correctly, which many find reassuring.
For those looking for the “Best Choice,” many professional home canners prefer a Dual-System. Using a canner with both a dial (for monitoring) and a weight (for regulation) provides the highest level of redundancy. When you invest in a high-quality pressure canner, you aren’t just buying a pot; you are buying a laboratory-grade sterilization chamber that virtually eliminates the risk of spoilage when used correctly. Brands like Presto and All-American dominate this space for a reason: they are built to USDA safety specifications.
The Proper “Detoxification” and Disposal of Spoiled Jars
What do you do when you find a jar that is clearly spoiled? Most people just dump it in the trash or down the sink. However, if the jar shows signs of botulism (bulging lid, spurting liquid, or low-acid food that looks “funky”), the USDA recommends a specific Detoxification Protocol to ensure the toxins don’t harm sanitation workers, pets, or wildlife. You cannot treat a botulism-positive jar like a regular piece of trash.
- Wear Protection: The botulism toxin can actually be absorbed through small cuts in your skin. Wear disposable gloves and eye protection before handling the jar.
- Do Not Splash: Carefully place the suspect jar (opened) and its lid in an 8-quart or larger pot. Do not pour the contents down the drain, as this can contaminate your plumbing and septic system.
- The Boil Method: Cover the jar with at least 1 inch of water. Bring the water to a rolling boil.
- Time it: Boil the jar, lid, and food for at least 30 minutes. This sustained high heat is required to completely deactivate the botulism toxin.
- Clean the Area: Any surface that touched the spoiled food or the raw liquid must be cleaned with a fresh solution of 1 part unscented liquid bleach to 5 parts water. Let the bleach sit for 5 minutes before wiping to ensure total sterilization.
While this may seem extreme, it is the only way to be 100% certain that the “invisible killer” is neutralized. Food safety is a community responsibility, and disposing of spoiled goods properly is part of being an expert preserver. Never take a shortcut when a life is on the line.
Storage Environment:
You can follow every USDA rule during the canning process and still end up with spoiled food if your storage environment is poor. Most people store their jars in a kitchen cabinet or a basement, but not all locations are created equal. Storage is the “forgotten” stage of food preservation, but it is just as critical as the processing time.
- Temperature Stability: The ideal temperature for canned goods is between 50°F and 70°F. If your pantry gets above $95°F$ (like a garage in summer), you risk “activating” thermophilic bacteria that can survive standard processing. These bacteria will spoil your food from the inside out without ever breaking the seal, leading to that dreaded “flat-sour” taste.
- Humidity: High humidity can cause the metal lids to rust. Once a pinhole of rust eats through the lid, the vacuum is lost, and mold will begin to grow. If you live in a humid climate, consider using a dehumidifier in your storage area or wiping your jars down with a very light coat of food-grade oil to prevent oxidation.
- Light Exposure: Direct sunlight is the enemy of quality. Light causes “photo-oxidation,” which breaks down the pigments and vitamins in your food. This is why many experts prefer “Amber” jars or dark, enclosed pantries.
By controlling the “After-Life” of your jars, you extend your food’s shelf life from the standard 12 months to potentially 18–24 months of peak quality. A well-managed pantry is a high-yield asset for any household, and protecting that asset requires a cool, dry, and dark environment. If you treat your jars like the liquid gold they are, they will nourish your family safely for years to come.
Expert Insight: Building a “Security” Pantry
As someone who has managed a family pantry for over a decade, I’ve learned that food preservation is about patience. We live in a world of “instant results,” but canning is slow. The most common cause of spoilage I see is “rushing the process”—pulling jars out of the canner too fast or not letting the pressure drop naturally.
When you see a jar that looks “off,” your brain will try to convince you it’s fine because you don’t want to waste the money. Don’t listen. Think of your canning budget like an insurance policy. Throwing away a $5 jar of beef is much cheaper than a $50,000 hospital stay.
Frequently Asked Questions
Q: Can I re-process a jar if the lid didn’t seal?
A: Yes, but only within 24 hours. You must check the jar rim for nicks, use a brand-new lid, and re-process for the full amount of time. Usually, it’s better to just put that jar in the fridge and eat it for dinner.
Q: Why did my liquid turn cloudy?
A: If it’s peas or potatoes, it’s likely just starch. If it’s anything else, or if the cloudiness is accompanied by sediment that “moves” when you shake the jar, it’s bacterial spoilage.
Q: Is it safe to eat food from a jar that was stored in a freezing garage?
A: Freezing can expand the food and break the seal. Once the food thaws, the vacuum is gone and bacteria will enter. If your jars froze and the seals are broken, they are unsafe.
Q: My jam has a tiny bit of mold on top. Can I scrape it off?
A: No. USDA guidelines state that mold filaments can reach deep into the soft structure of jams and jellies. Some molds produce mycotoxins that are heat-stable and dangerous.
Conclusion:
Identifying the signs of spoiled canned food is a skill that combines vigilance with scientific knowledge. By sticking to USDA-approved methods, investing in high-quality pressure canners, and performing a rigorous 4-stage inspection on every jar, you can provide your family with a pantry that is both delicious and safe.
Your Next Step: Perform a “Pantry Audit” today. Go through your stock, remove the rings, check for concave lids, and ensure your storage area is cool and dark. Remember: A safe pantry is a successful pantry.